How To Setup Nested Proxmox (or Proxmox on Proxmox)
April 15, 2024

With many users moving from VMware to Proxmox due to the licencing changes, there is an increased need to understand the Proxmox PVE hypervisor behaviour.
A nested test lab may offer a good solution to help you quickly get to grips with the clustering behaviour.
Understanding nested behaviour
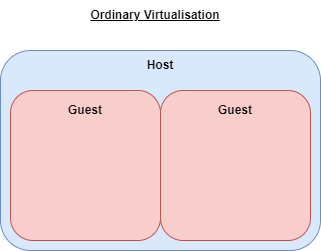
“Nested” virtualisation is when you run a hypervisor on an already hypervised guest VM - you can think of it as like a set of Russian dolls, or the “dream within a dream” of the movie Inception.
At the top level you have a physical hypervisor which can host virtual machine “guests”. The top-level guest can be set up to run as a hypervisor itself, making it effectively both a guest and a host.
Guest VMs within guest VMs can then be run.
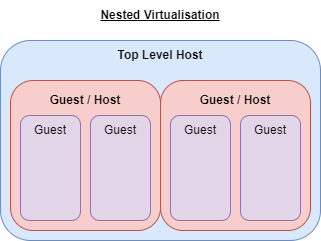
It is important to note that with each layer, you incur a resource hit for the operating system, leaving less and less resource available to the guests at the next level down.
This having been said, the value of nested virtualisation is that you can build more complex environments with a limited set of hardware.
I was able to build a three node nested Proxmox cluster using only a single laptop, allowing me to test out the cluster failover behaviour.
Host Prerequisites
On the Proxmox host, open up the shell and run the following command to check that nested virtualisation is supported.
cat /sys/module/kvm_intel/parameters/nested
If you have any response other than “Y” you need to check the official Proxmox documentation as other kernel modifications may be required.
Setting up Proxmox on Proxmox
Setting up a nested hypervisor starts the same way as any other guest VM - create the VM and allocate the CPU, memory and disk resources.
You should also check the “qemu-agent” checkbox during this initial setup.
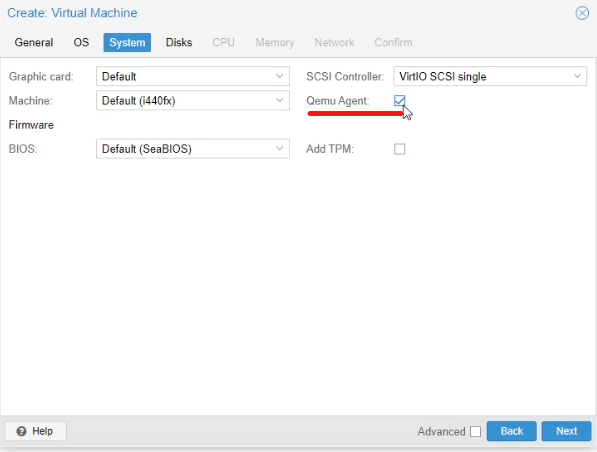
Personally, I would try to use at least 2 cores (and probably a couple of sockets) with the CPU set to “host”, and 4GB of RAM. I would also use as much disk as makes sense depending on what you have planned - if you are building a virtualised Proxmox cluster as I did, dividing up the available host disk space equally makes a lot of sense.
Networking options will depend on what you are trying to do with the environment.
With the guest VM options set, and the new VM set up to use the Proxmox installation ISO, you can install this as normal using a Console session.
On the network configuration step, I would set the nested hypervisor VM to use a static IP address.
Guest Agent Integration
When the nested hypervisor has completed the Proxmox installation, you should be able to connect using a web browser to the IP you specified during setup.
If you used DHCP and don’t know the IP, login to the Proxmox host using the Console connection, and run the command “ip address”. The IP address should then be displayed, and you should be able to connect.
It is best practice to install and enable the qemu guest agent on the nested hypervisor.
Open a Console (or Shell if connected to the nested host) and run the following commands:
apt-get install qemu-guest-agent

systemctl start qemu-guest-agent

systemctl enable qemu-guest-agent
This will install the qemu guest agent and set it to run on startup. The agent will communicate guest metrics and information back to the host, allowing you to more easily see what is going on within your Proxmox on Proxmox hypervisor.
Demonstration Video
The nested Proxmox setup steps are demonstrated here:
Next Steps
Depending on what you want to do, you may need to build out your environment by adding extra Proxmox hypervisor nodes by repeating the process you have just followed (although with different hostnames and IPs), before joining them together in a cluster.
The next post in this series covers this.